Why You'll Love It
- - Classic vanilla flavor that never goes out of style
- - Silky buttercream that stays soft at room temperature
- - Simple ingredients that are easy to find
- - Beautifully smooth finish ideal for photos
“The buttercream was so silky, and the cake felt like a warm memory. My daughter’s graduation was unforgettable.”
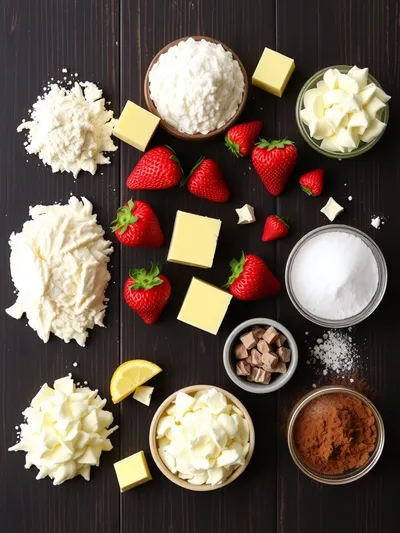
Essential Ingredient Guide
- All‑purpose flour: Provides structure; sift to keep the crumb light and airy
- Unsalted butter: Use at room temperature for a creamy buttercream and tender crumb
- Powdered sugar: Gives the frosting its smooth texture; sift to avoid lumps
- Vanilla extract: Adds depth; a premium vanilla yields a richer aroma
- Lemon juice: A touch of acidity brightens the buttercream and balances sweetness
- Honey (optional): If you like a subtle floral note, drizzle a teaspoon into the frosting
Complete Cooking Process
-
Ingredient Readiness:
Measure flour, sugar, and butter carefully; bring butter to room temp and sift dry ingredients.
-
Flavor Development:
Whisk the vanilla into the batter and later into the buttercream to infuse aromatic notes.
-
Texture Control:
Fold the whipped egg whites gently into the batter for a light, airy crumb.
-
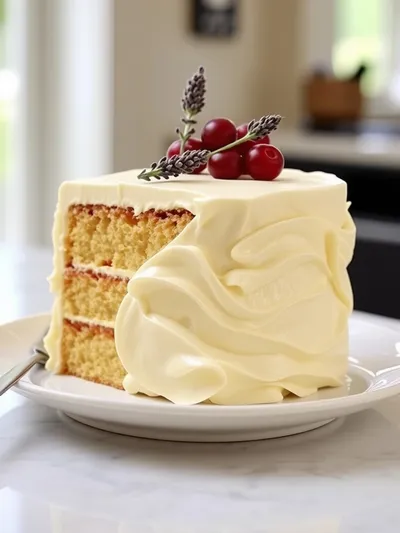
Finishing Touches:
Pipe the buttercream in smooth ribbons and smooth the sides with a bench scraper.
-
Serving Timing:
Allow the cake to sit at room temperature for 30 minutes before slicing so the frosting stays plush.
- Chill the mixing bowl for buttercream to keep the butter firm
- Use a turntable for even frosting
- Trim the cake layers with a thin wire for flat tops
- Add a pinch of sea salt to the buttercream for depth
Pro Tips
Well, those little adjustments can make a world of difference. I mean, the cake will still be lovely, but the finish becomes that polished, vintage look you see on magazine spreads. Ugh, I always love that moment when the frosting glides perfectly over the crumb. Look, patience in each step really pays off.
The essence of the dish:
A fun fact or historical angle:
Flavor or sensory focus:
You Must Know
- Butter must be softened, not melted
- Sifted flour keeps the crumb airy
- Room‑temperature frosting spreads evenly
Frequently Asked Questions
→ Can I make the buttercream ahead of time?
Yes, store it in an airtight container in the fridge for up to 2 days, then bring to room temperature and re‑whisk before using.
→ What if I don’t have a stand mixer?
A hand mixer works fine; just be patient while beating the buttercream to a smooth consistency.
→ Can I substitute almond flour for the all‑purpose flour?
Almond flour will change the texture, making it denser; stick with all‑purpose for the authentic light crumb.
→ How do I keep the frosting from melting on a warm day?
Serve the cake in a cool room and keep it out of direct sunlight; a chilled serving plate helps.
→ Is the recipe suitable for gluten‑free diets?
Swap the all‑purpose flour for a 1‑to‑1 gluten‑free flour blend; the texture remains pleasant.
→ Can I add fresh fruit between the layers?
Absolutely—thinly sliced strawberries or raspberries add a fresh pop that pairs well with the vanilla buttercream.
Chef's Tips
If the buttercream feels too thick, add a teaspoon of milk to loosen it.,For a deeper flavor, toast the vanilla beans before extracting.,A light dusting of edible gold leaf adds a celebratory shimmer without overpowering the taste.
Nutrition Facts
per serving
420
Calories
5g
Protein
48g
Carbs
22g
Fat
Taste Profile
A sweet, buttery cake with a hint of citrus brightness
Ingredient Substitutions
Don't have an ingredient? Try these alternatives
Use a 1‑to‑1 ratio; the crumb will stay light.
May affect flavor slightly; choose a high‑quality brand.
Recipe Variations
Try these delicious twists on the original
Spicy Version
Add a pinch of ground cinnamon and a dash of nutmeg to the batter for warm undertones.
Mediterranean Style
Fold in finely chopped dried apricots and a drizzle of orange blossom water into the frosting.
Common Mistakes to Avoid
Learn from others' mistakes for perfect results
- Overmixing batter, which can make the cake dense.
- Using cold butter for frosting, leading to lumps.
- Not leveling layers, causing uneven frosting.
Meal Prep & Storage
Make Ahead Tips
You can bake and cool the sponge layers up to 24 hours ahead; store frosting in the fridge and re‑whisk before using.
Leftover Ideas
Store slices in an airtight container; re‑warm gently in the microwave for 10‑15 seconds before serving.
Perfect Pairings
Serve this with...
Cooking Timeline
Gather and measure all ingredients; preheat oven.
Cream butter and sugar, add eggs and flavorings.
Fold in dry ingredients, pour batter into pans, bake.
Cool cake layers; whip buttercream.
Assemble, frost, and garnish the cake.
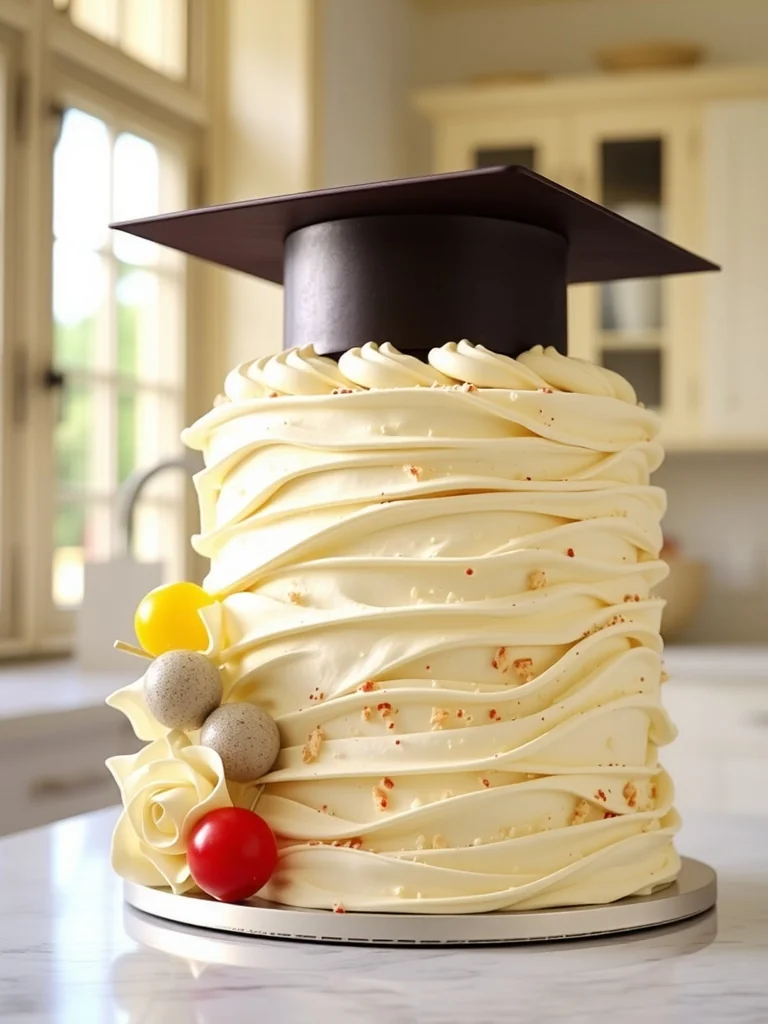
Vintage Buttercream Graduation Cake
A nostalgic vintage buttercream graduation cake that brings together soft sponge layers and silky smooth frosting, perfect for marking a cherished milestone with elegance and warmth.
Timing
Prep Time
30 Minutes
Cook Time
25 Minutes
Total Time
55 Minutes
Recipe Details
Ingredients
Sponge Layers
- 01 2 cups all‑purpose flour
- 02 1 ½ cups granulated sugar
- 03 1 cup unsalted butter, softened
- 04 4 large eggs
- 05 1 cup milk
- 06 2 tsp vanilla extract
- 07 2 tsp baking powder
- 08 ¼ tsp salt
Buttercream Frosting
- 01 1 ½ cups unsalted butter, room temperature
- 02 4 cups powdered sugar, sifted
- 03 2 tsp vanilla extract
- 04 1 tbsp lemon juice
- 05 Pinch of sea salt
Instructions
Preheat the oven to 350°F (175°C). Grease two 9‑inch round pans and line the bottoms with parchment.
In a large bowl, cream the butter and sugar together until light and fluffy; this should take about 3‑4 minutes.
Add the eggs one at a time, beating well after each, then stir in the vanilla and lemon juice.
Sift together flour, baking powder, and salt; gently fold the dry mixture into the wet ingredients, alternating with the milk.
Divide the batter evenly between the pans and bake for 20‑25 minutes, or until a toothpick comes out clean. Let cool completely on a wire rack.
While the cakes cool, beat the butter for the frosting until creamy, then gradually add powdered sugar, vanilla, lemon juice, and sea salt, beating until smooth and glossy.
Level the cooled cake layers, place the first layer on a serving plate, spread a generous amount of buttercream, then top with the second layer and coat the top and sides evenly.
Smooth the frosting with a bench scraper; for an extra vintage touch, pipe simple rosette borders using a vanilla icing tip.
Notes & Tips
- 1 If the buttercream feels too thick, add a teaspoon of milk to loosen it.
- 2 For a deeper flavor, toast the vanilla beans before extracting.
- 3 A light dusting of edible gold leaf adds a celebratory shimmer without overpowering the taste.
Tools You'll Need
-
Two 9‑inch round cake pans
-
Electric mixer
-
Spatula
-
Sifter
-
Bench scraper
-
Piping bag and tip
Must-Know Tips
- Don’t overmix the batter; it can make the crumb tough.
- Room‑temperature butter yields a smoother frosting.
- Trim the cake layers for a flat surface before frosting.
Professional Secrets
- Cream butter and sugar until the mixture ribbons; this traps air for a lighter crumb.
- Add a pinch of salt to the buttercream to enhance sweetness.
- Use a turntable to keep the cake level while smoothing frosting.
Recipe by
EvaEva is a seasoned home‑cook turned recipe developer who brings a dash of curiosity and a pinch of precision to every dish she creates for Your Website ...
Get Delicious Recipes Weekly
Join 25,000+ home cooks getting our best recipes straight to their inbox.
Free forever • No spam • Unsubscribe anytime