Why You'll Love It
- - No added sugar, yet sweet and satisfying
- - Quick no‑bake preparation
- - Creamy texture that holds together beautifully
- - Perfect for low‑carb or keto plans
*"These bars are my new go‑to snack – creamy, buttery, and totally guilt‑free!"*
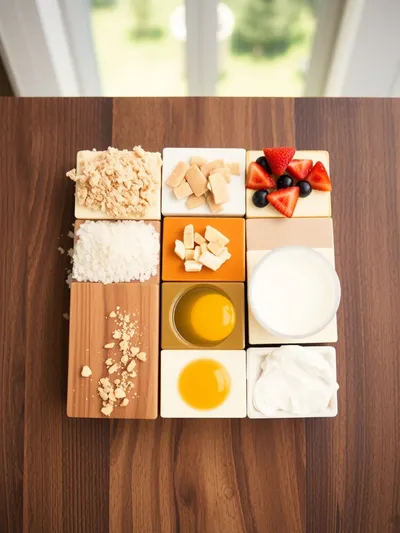
Essential Ingredient Guide
- Cream cheese: Choose full‑fat cream cheese for a rich, silky base; let it soften to room temperature before mixing.
- Almond flour: Provides a gentle nutty flavor and keeps the bars gluten‑free; sift lightly to avoid clumps.
- Erythritol: A sugar substitute that blends smoothly; adjust to taste, remembering it can crystallize if over‑used.
- Vanilla extract: A few drops bring warmth and depth; quality vanilla makes a subtle difference.
- Lemon zest: Adds a bright citrus note that lifts the richness without adding sugar.
- Butter: Melted butter binds the crust; use unsalted to control salt levels.
Complete Cooking Process
-
Ingredient Readiness:
Soften cream cheese, measure almond flour, and zest the lemon; have everything within arm’s reach before you start.
-
Flavor Development:
Combine butter, almond flour, and a pinch of salt for the crust; press into a pan to set a sturdy base.
-
Texture Control:
Whip cream cheese with erythritol and vanilla until smooth, then fold in zest; this keeps the filling airy.
-
Finishing Touches:
Spread the filling over the crust, chill until firm, then slice into bars.
-
Serving Timing:
Allow the bars to sit at room temperature for a few minutes before serving to soften the texture.
- Use a rubber spatula to scrape every bit of cream cheese from the bowl.
- Chill the pan for 10 minutes before adding the crust to help it set faster.
- Dust the top with a light sprinkle of powdered erythritol for extra elegance.
Pro Tips
Well, those little adjustments can make the difference between a good bar and a great one. I find that a short pause while the bars firm up in the fridge gives the flavors a moment to mingle, and the result feels just right. So, take your time, and enjoy each step.
The essence of the dish:
A fun fact or historical angle:
Flavor or sensory focus:
You Must Know
- Keep cream cheese at room temperature
- Do not over‑mix the filling
- Chill long enough for firm slices
Frequently Asked Questions
→ Can I use a different sweetener?
Yes, monk fruit or stevia work well; just adjust the amount to taste.
→ Is this recipe keto‑friendly?
Absolutely, it stays under 5 g net carbs per serving.
→ How long can the bars be stored?
Keep them refrigerated in an airtight container for up to 5 days.
→ Can I freeze them?
Yes, wrap tightly and freeze for up to a month; thaw in the fridge before serving.
→ What can I use instead of almond flour?
Coconut flour works, but use less as it absorbs more moisture.
→ Do I need a springform pan?
A simple 8×8 inch pan works fine; just line it with parchment paper.
Chef's Tips
Use room‑temperature cream cheese to avoid lumps.,Press the crust firmly for a clean edge.,If the filling seems too thick, whisk in a splash of heavy cream.
Nutrition Facts
per serving
180
Calories
6g
Protein
5g
Carbs
15g
Fat
Taste Profile
Creamy with a gentle citrus tang
Ingredient Substitutions
Don't have an ingredient? Try these alternatives
Slightly lower in fat but maintains texture; may need a bit more sweetener.
Same sweetness level, watch for a grainy finish if over‑used.
Recipe Variations
Try these delicious twists on the original
Spicy Version
Add a pinch of cayenne and a drizzle of strawberry cheesecake jam for subtle heat and color.
Mediterranean Style
Stir in chopped pistachios and a teaspoon of orange zest for a bright, nutty twist.
Common Mistakes to Avoid
Learn from others' mistakes for perfect results
- Over‑mixing the filling, which can create a grainy texture.
- Cutting the bars before they are fully chilled, leading to crumbling.
- Using cold cream cheese, resulting in lumps.
Meal Prep & Storage
Make Ahead Tips
You can prepare the crust and filling separately, wrap each tightly, and store in the refrigerator for up to 24 hours before assembling.
Leftover Ideas
Refrigerate leftover bars; enjoy within five days, or freeze for longer storage.
Perfect Pairings
Serve this with...
Cooking Timeline
Prepare crust: mix almond flour, butter, sweetener, and salt; press into pan.
Beat cream cheese until smooth, then add sweetener, vanilla, lemon zest, and cream.
Spread filling over crust, smoothing top.
Place pan in refrigerator to chill and set.
Allow bars to firm for at least 2 hours before slicing.

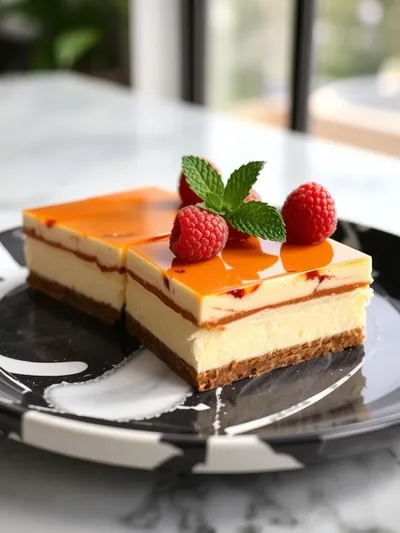
Sugar-Free Cheesecake Bars – Guilt-Free Treat
These sugar‑free cheesecake bars are a silky, low‑carb indulgence that feels like a small celebration. Perfect for a quick snack or a gentle finish to a meal, they offer creamy richness without the added sugar.
Timing
Prep Time
15 Minutes
Cook Time
0 Minutes
Total Time
15 Minutes
Recipe Details
Ingredients
Crust
- 01 1/2 cup almond flour
- 02 3 tbsp melted butter
- 03 1 tbsp erythritol
- 04 Pinch of salt
Filling
- 01 8 oz full‑fat cream cheese, softened
- 02 1/4 cup erythritol
- 03 1 tsp vanilla extract
- 04 1 tsp lemon zest
- 05 2 tbsp heavy cream
Instructions
Combine almond flour, melted butter, erythritol, and salt in a bowl; press the mixture into the bottom of an 8×8 inch pan.
In a separate bowl, beat the softened cream cheese until smooth, then add erythritol, vanilla, lemon zest, and heavy cream; mix until silky.
Spread the cream cheese filling over the crust, smoothing the top with a spatula.
Refrigerate for at least 2 hours until firm; slice into bars and serve.
Optional: drizzle with a touch of melted chocolate cheesecake glaze for a richer flavor.
Notes & Tips
- 1 Use room‑temperature cream cheese to avoid lumps.
- 2 Press the crust firmly for a clean edge.
- 3 If the filling seems too thick, whisk in a splash of heavy cream.
Tools You'll Need
-
8×8 inch baking pan
-
Parchment paper
-
Mixing bowls
-
Hand mixer or spatula
-
Measuring cups and spoons
-
Refrigerator
Must-Know Tips
- Don't over‑mix the filling; it can become grainy.
- Let the bars chill fully before cutting for clean slices.
- Taste the sweetener early; adjust to your preference.
Professional Secrets
- Room temperature cream cheese ensures a smooth blend.
- Press the crust while it’s still warm for better adhesion.
- A brief chill after the crust sets sharpens the edge.

Recipe by
EvaEva is a seasoned home‑cook turned recipe developer who brings a dash of curiosity and a pinch of precision to every dish she creates for Your Website ...
Get Delicious Recipes Weekly
Join 25,000+ home cooks getting our best recipes straight to their inbox.
Free forever • No spam • Unsubscribe anytime