Why You'll Love It
- - Easy, no‑bake preparation that fits a busy day
- - Classic flavors that spark happy memories
- - Crispy texture contrasted with creamy swirl
- - Versatile for parties, lunchboxes, or a quiet night
“These Peanut Butter & Jelly Rice Krispie Treats are the perfect bite of nostalgia—sweet, salty, and just a little gooey. Everyone asks for the recipe!”
Essential Ingredient Guide
- Rice Krispies cereal: Choose the original toasted version for a light crunch; avoid flavored varieties that may clash with the sweet‑salty balance.
- Marshmallows: Large mini‑marshmallows melt smoothly; if you’re avoiding gelatin, seek a plant‑based alternative.
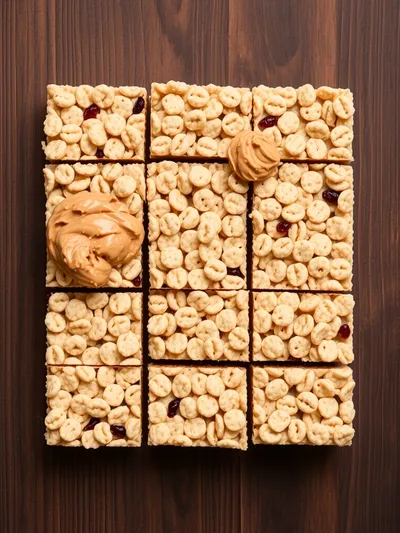
- Peanut butter: Creamy natural peanut butter adds depth; stir it in before the cereal sets for even coating.
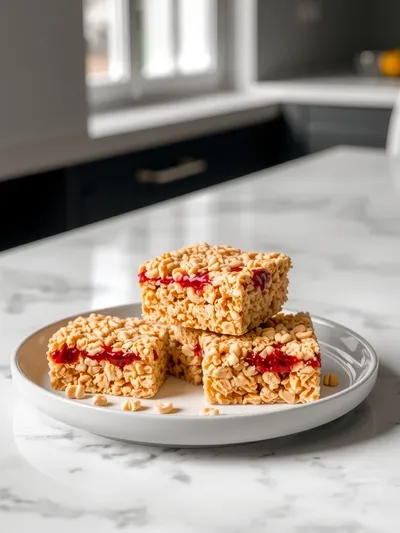
- Fruit jelly: A bright grape or strawberry jam gives the iconic pink ribbon; warm it slightly for easier spreading.
- Butter: Unsalted butter is melted with marshmallows; it carries a subtle richness that ties the flavors together.
- Vanilla extract: Just a splash adds warmth without overpowering the peanut‑jelly duo.
Complete Cooking Process
-
Ingredient Readiness:
Measure cereal, melt butter and marshmallows together, and have peanut butter and jelly ready at room temperature.
-
Flavor Development:
Whisk marshmallows until glossy, then fold in butter and vanilla, allowing the scent of toasted sugar to rise.
-
Texture Control:
Stir in cereal quickly to keep each puff separate, then reserve a portion for the top layer.
-
Finishing Touches:
Spread a thin layer of peanut butter, drizzle jelly in a ribbon, and press the remaining cereal mixture on top.
-
Serving Timing:
Let the treat set for 10‑15 minutes at room temperature before slicing; it holds best when slightly cooled.
- Work quickly once the marshmallows melt; the mixture hardens fast.
- Use a greased pan or parchment paper to avoid sticking.
- For extra shine, brush the top with a light honey glaze.
- Press gently with a flat spatula to keep the jelly ribbon visible.
Pro Tips
Well, these little secrets keep the treats from becoming a sticky mess. I remember an early version that turned out too soft, and by adding that quick press I saved the texture. It’s those tiny adjustments that make the difference between good and unforgettable. So, when you pull the pan out, let it rest a moment. The aroma will fill the kitchen, and you’ll feel that calm satisfaction of a treat done right.
The essence of the dish:
A fun fact or historical angle:
Flavor or sensory focus:
You Must Know
- Do not over‑mix, or the treats become dense.
- Cool slightly before cutting for clean edges.
- Store in an airtight container to retain crunch.
Frequently Asked Questions
→ Can I use crunchy peanut butter?
Yes, but it will add extra texture; the treats will feel a bit grainier.
→ What if I’m allergic to peanuts?
Swap peanut butter with almond or cashew butter; the flavor profile stays rich.
→ How long do the treats stay fresh?
Stored in a sealed container at room temperature, they remain crunchy for up to three days.
→ Can I freeze them?
Freezing is possible, but the texture may soften; thaw at room temperature before serving.
→ Do I need a special pan?
A standard 9‑x‑13 inch baking dish works; line it with parchment for easy removal.
→ What other jams work well?
Raspberry, strawberry, or apricot jam all add a lovely fruity contrast.
Chef's Tips
If the marshmallows seize, add a splash of milk to loosen.,Use a spatula greased with butter to press the layers without sticking.,For extra visual appeal, drizzle a thin line of extra jelly on top after setting.
Nutrition Facts
per serving
210
Calories
4g
Protein
26g
Carbs
11g
Fat
Taste Profile
A sweet‑salty balance with fruity brightness
Ingredient Substitutions
Don't have an ingredient? Try these alternatives
Provides a milder flavor; keep the same quantity.
Use the same volume; melt them the same way.
Recipe Variations
Try these delicious twists on the original
Spicy Version
Add a pinch of cinnamon and a drizzle of honey for a warm, comforting twist.
Mediterranean Style
Swap jelly for apricot preserves and sprinkle chopped pistachios on top.
Common Mistakes to Avoid
Learn from others' mistakes for perfect results
- Over‑mixing the cereal, which makes it dense.
- Adding jelly while the base is still hot, causing it to melt into the mixture.
- Skipping the cooling period, leading to crumbs falling apart.
Meal Prep & Storage
Make Ahead Tips
You can melt the base mixture up to 24 hours ahead, keep it refrigerated, and add the peanut butter and jelly just before serving.
Leftover Ideas
Reheat gently in a skillet with a touch of butter to restore softness, or enjoy cold; the texture stays pleasant.
Perfect Pairings
Serve this with...
Cooking Timeline
Melt butter and marshmallows together, stirring continuously.
Remove from heat, add vanilla, and fold in Rice Krispies.
Press base layer into pan, spread peanut butter and drizzle jelly.
Add remaining cereal mixture, press lightly, optionally glaze with honey.
Let set, then slice into squares.
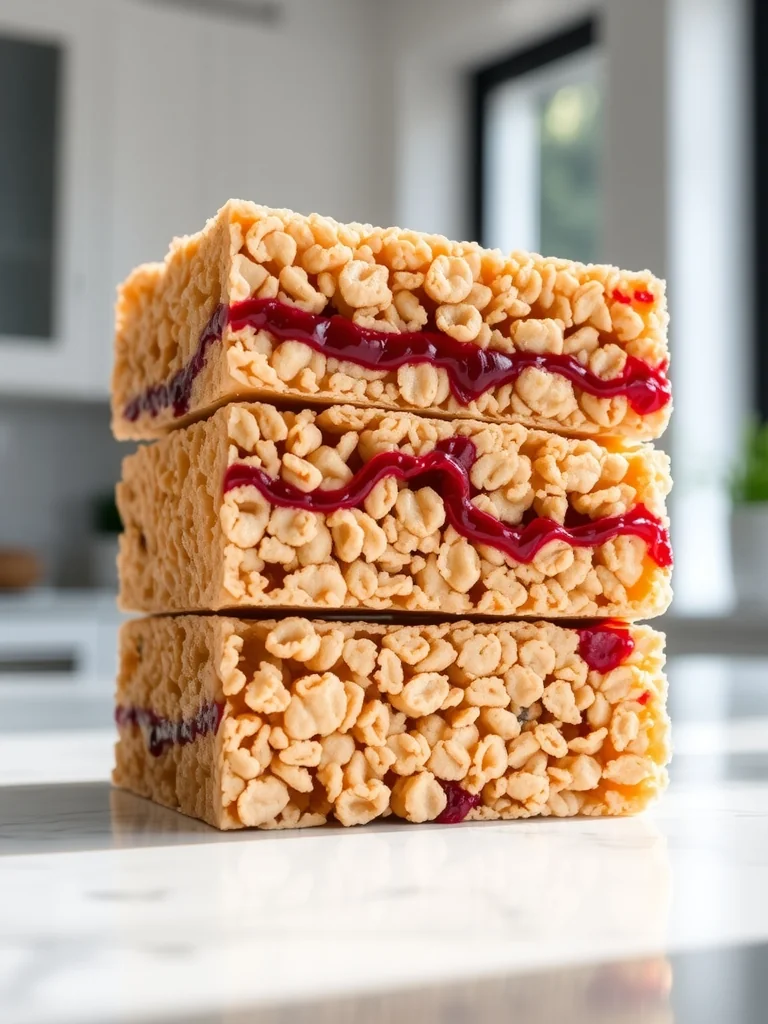
Peanut Butter & Jelly Rice Krispie Treats
A sweet, crunchy twist on a classic sandwich—peanut butter and jelly folded into airy Rice Krispie treats, perfect for a quick snack or playful dessert.
Timing
Prep Time
15 Minutes
Cook Time
5 Minutes
Total Time
20 Minutes
Recipe Details
Ingredients
Base
- 01 6 cups Rice Krispies cereal
- 02 4 tbsp unsalted butter
- 03 3 cups mini marshmallows
- 04 1 tsp vanilla extract
Filling & Topping
- 01 ½ cup creamy peanut butter
- 02 ¼ cup fruit jelly (grape or strawberry)
- 03 1 tbsp honey (optional, for glaze)
Instructions
In a large saucepan over medium heat, melt the butter, then add marshmallows, stirring until completely smooth.
Remove from heat, stir in vanilla, then fold in the Rice Krispies until evenly coated.
Press two‑thirds of the cereal mixture into a greased 9‑x‑13 inch pan, creating an even layer.
Warm the peanut butter slightly and spread it over the base layer; then drizzle the jelly in a graceful ribbon, using a knife to swirl gently.
Top with the remaining cereal mixture, pressing lightly. If desired, brush the surface with honey for a glossy finish.
Allow the treats to set for 10‑15 minutes before cutting into squares.
Notes & Tips
- 1 If the marshmallows seize, add a splash of milk to loosen.
- 2 Use a spatula greased with butter to press the layers without sticking.
- 3 For extra visual appeal, drizzle a thin line of extra jelly on top after setting.
Tools You'll Need
-
Large saucepan
-
Wooden spoon
-
9‑x‑13 inch baking dish
-
Spatula
-
Measuring cups
-
Parchment paper
Must-Know Tips
- Don't over‑mix the cereal, it can become soggy.
- Let the mixture cool just enough to handle; it hardens quickly.
- Slice with a sharp knife for clean edges.
Professional Secrets
- Melt marshmallows over low heat to prevent browning.
- Add butter first for a richer flavor foundation.
- Press gently but firmly to ensure the jelly ribbon stays visible.

Recipe by
EvaEva is a seasoned home‑cook turned recipe developer who brings a dash of curiosity and a pinch of precision to every dish she creates for Your Website ...
Get Delicious Recipes Weekly
Join 25,000+ home cooks getting our best recipes straight to their inbox.
Free forever • No spam • Unsubscribe anytime