Why You'll Love It
- - No oven needed, perfect for warm days
- - Fresh strawberry flavor shines through
- - Easy to portion, great for parties
- - Creamy texture that melts gently
*"These cups are pure comfort, like a hug in a glass."*
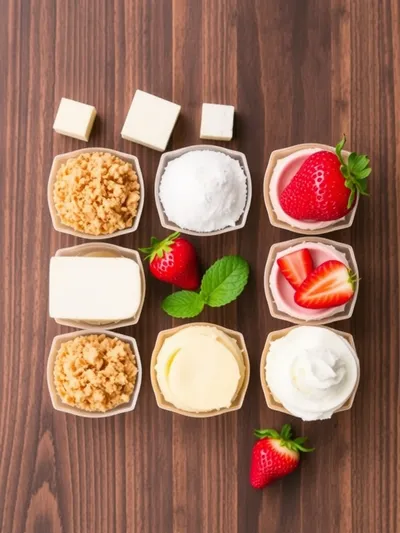
Essential Ingredient Guide
- Graham cracker crust: Provides a buttery base; crush finely and press with melted butter for stability.
- Cream cheese: Use full‑fat for richness; let it soften to avoid lumps.
- Fresh strawberries: Slice thinly; they add natural sweetness and a pop of color.
- Vanilla extract: A few drops deepen the aromatic backdrop of the filling.
- Lemon juice: Brightens the flavor and balances the sweetness.
- Whipped topping: Stirs in air for a light, mousse‑like finish.
Complete Cooking Process
-
Ingredient Readiness:
Soak the graham crumbs in melted butter, soften the cream cheese, and wash the berries. This prepares each component for a seamless blend.
-
Flavor Development:
Mix the cream cheese with sugar, vanilla, and lemon juice until smooth; the aroma becomes gently fragrant.
-
Texture Control:
Fold in whipped topping carefully, preserving the airy texture that keeps each cup light.
-
Finishing Touches:
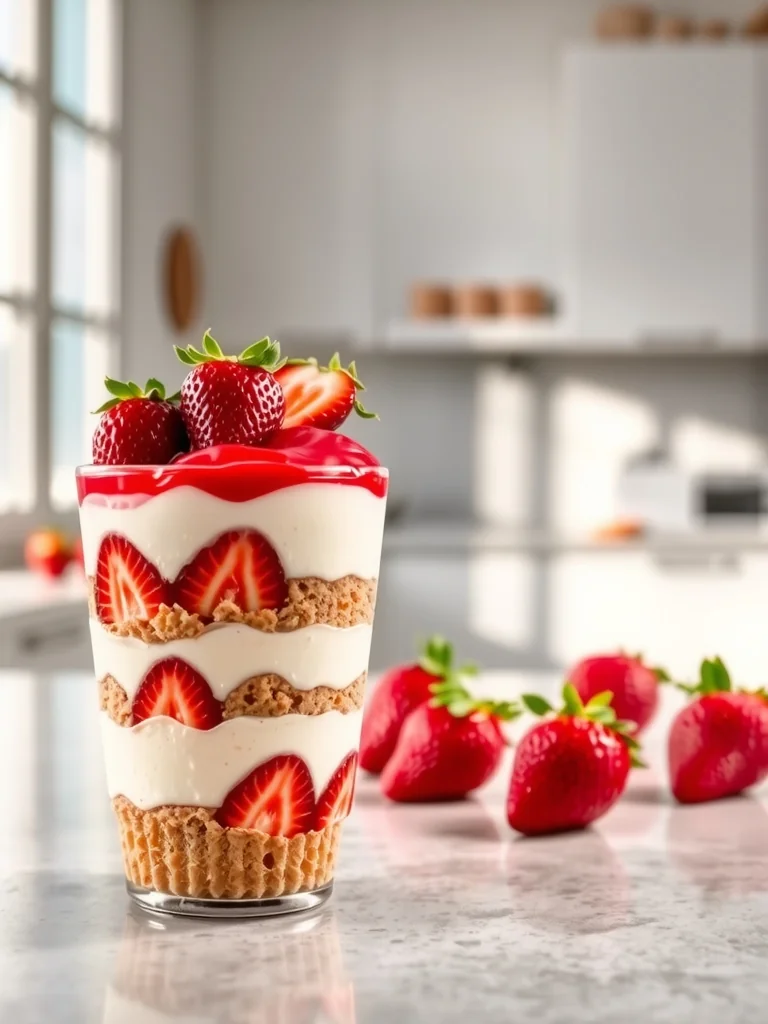
Layer sliced strawberries on top and chill; a final drizzle of strawberry puree adds shine.
-
Serving Timing:
Allow the cups to sit in the fridge at least two hours; the set is firm yet creamy when served.
- Use chilled bowls for quicker setting.
- Add a pinch of salt to the crust for depth.
- Swap lemon juice for orange zest for a citrus twist.
- Garnish with a mint leaf for freshness.
Pro Tips
Well, these little tricks make a world of difference. I often find that a cold dish helps the filling firm up faster, and a tiny pinch of salt brightens the buttery crust. When I garnish, I love the subtle snap of a fresh mint leaf—it lifts the whole experience. Ugh, sometimes I forget to let the cups rest long enough, and they turn out a bit too soft. Just remember: patience is part of the pleasure.
The essence of the dish:
A fun fact or historical angle:
Flavor or sensory focus:
You Must Know
- Set the crust firmly to avoid sogginess
- Use room‑temperature cream cheese for smoothness
- Layer strawberries just before chilling
Frequently Asked Questions
→ Can I use a different crust?
Yes, you can substitute crushed shortbread cookies or almond flour for a gluten‑free option.
→ How long can the cups be stored?
Keep them refrigerated in an airtight container for up to three days.
→ Do I need a food processor for the crust?
A plastic bag and rolling pin work fine; just crush the crackers finely.
→ Can I freeze these cups?
Freezing is possible, but the texture of the whipped topping may change; thaw gently in the fridge.
→ What if I’m out of fresh strawberries?
Use frozen berries thawed and drained, or swap with raspberries for a different flavor.
→ Is there a dairy‑free version?
Replace cream cheese with a vegan cream cheese alternative and use coconut‑based whipped topping.
Chef's Tips
If the crust seems crumbly, press a bit more firmly and add an extra drizzle of butter.,For a richer flavor, fold in a tablespoon of honey into the filling.,Keep the cups covered to prevent the strawberries from drying out.
Nutrition Facts
per serving
250
Calories
4g
Protein
22g
Carbs
15g
Fat
Taste Profile
Creamy with bright strawberry sweetness
Ingredient Substitutions
Don't have an ingredient? Try these alternatives
Provides tanginess; adjust sugar slightly.
Similar texture, slightly less sweet.
Recipe Variations
Try these delicious twists on the original
Spicy Version
Add a pinch of ground ginger and a drizzle of honey for a warm, subtle kick.
Mediterranean Style
Stir in a spoonful of ricotta and top with sliced figs for a sweet‑savory twist.
Common Mistakes to Avoid
Learn from others' mistakes for perfect results
- Over‑mixing the cream cheese, leading to a grainy texture.
- Not chilling the crust long enough, causing it to crumble.
- Adding strawberries too early, making them soggy.
Meal Prep & Storage
Make Ahead Tips
You can prepare the crust and filling a day ahead; just keep them separate and assemble right before serving.
Leftover Ideas
Refrigerate the remaining cups; enjoy within three days for best texture.
Perfect Pairings
Serve this with...
Cooking Timeline
Crush crackers, melt butter, and press crust into cups.
Beat cream cheese, sugar, vanilla, and lemon until smooth.
Fold whipped topping gently into the cheese mixture.
Layer filling into cups, top with strawberries, and chill.
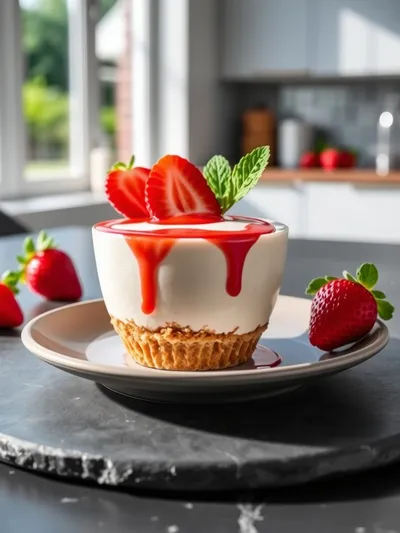
No-Bake Strawberry Cheesecake Cups – Creamy Layers
These strawberry cream cheese pie inspired cups are silky, bright, and perfect for a quiet afternoon. The crust whispers buttery crumb while fresh strawberries shine through the velvety filling.
Timing
Prep Time
15 Minutes
Cook Time
0 Minutes
Total Time
15 Minutes
Recipe Details
Ingredients
Crust
- 01 1 1/2 cups graham cracker crumbs
- 02 3 tbsp melted butter
- 03 2 tbsp sugar
Filling
- 01 8 oz full‑fat cream cheese, softened
- 02 1/4 cup powdered sugar
- 03 1 tsp vanilla extract
- 04 1 tbsp lemon juice
- 05 1/2 cup whipped topping
- 06 1 cup fresh strawberries, sliced
Instructions
Combine graham crumbs, sugar, and melted butter; press the mixture into the bottom of six 4‑oz cups, then chill while you prepare the filling.
In a bowl, beat the softened cream cheese, powdered sugar, vanilla, and lemon juice until smooth and fragrant.
Gently fold in the whipped topping, being careful not to deflate it, then spoon the creamy mixture over the prepared crusts.
Top each cup with sliced strawberries; optionally drizzle a thin strawberry puree for extra shine.
Refrigerate for at least two hours, or until set. Serve chilled.
Notes & Tips
- 1 If the crust seems crumbly, press a bit more firmly and add an extra drizzle of butter.
- 2 For a richer flavor, fold in a tablespoon of honey into the filling.
- 3 Keep the cups covered to prevent the strawberries from drying out.
Tools You'll Need
-
Six 4‑oz glass cups
-
Mixing bowl
-
Electric mixer or whisk
-
Measuring cups and spoons
-
Spatula
Must-Know Tips
- Don't over‑mix the cream cheese; it can become grainy.
- Let the cups chill fully for best texture.
- Taste the filling before adding strawberries; adjust sweetness as needed.
Professional Secrets
- Room‑temperature cream cheese blends smoothly without lumps.
- Press the crust firmly to create an even base that holds up to the filling.
- A quick chill after layering locks in the airy texture of the whipped topping.

Recipe by
EvaEva is a seasoned home‑cook turned recipe developer who brings a dash of curiosity and a pinch of precision to every dish she creates for Your Website ...
Get Delicious Recipes Weekly
Join 25,000+ home cooks getting our best recipes straight to their inbox.
Free forever • No spam • Unsubscribe anytime