Why You'll Love It
- - Perfect portion size for gatherings or a solo treat
- - Bright lemon flavor balanced by sweet, airy meringue
- - Simple pantry staples, no fancy equipment needed
- - Quick to assemble, yet feels like a bakery creation
"These mini tarts are pure bliss – the lemon sings, the meringue whispers, and the crust stays crisp. My guests couldn’t stop asking for more!"
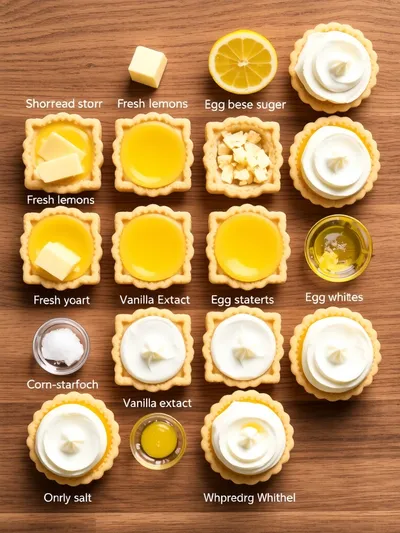
Essential Ingredient Guide
- Fresh lemons: The juice and zest give the curd its vivid tang; choose lemons with bright, unblemished skins for maximum aroma.
- Unsalted butter: Adds richness to the crust and a melt‑in‑your‑mouth texture; keep it cold until combined with flour.
- Egg whites: Stiff peaks create the signature cloud‑like meringue; a pinch of cream of tartar helps stabilize them.
- Granulated sugar: Sweetens both curd and meringue; be sure to dissolve it fully in the lemon mixture to avoid graininess.
- Lemon zest: Provides aromatic citrus oils that lift the flavor beyond simple juice.
- Cornstarch: Thickens the curd without adding heavy flour, giving a silky finish.
Complete Cooking Process
-
Ingredient Readiness:
Sift flour, zest the lemons, and separate egg whites; having everything measured beforehand ensures a smooth assembly.
-
Flavor Development:
Cook lemon curd gently, allowing the citrus to mellow and thicken, while the crust bakes to golden‑brown.
-
Texture Control:
Whip meringue to stiff peaks, then pipe or spoon it onto the warm tarts, creating a soft‑inside, lightly crisp exterior.
-
Finishing Touches:
Torch the meringue briefly or place under a broiler to achieve a subtle caramelized top.
-
Serving Timing:
Serve the tarts at room temperature; the meringue stays airy while the curd remains bright.
- Use a kitchen torch for even browning without over‑cooking the curd
- Pipe meringue in a swirl for an elegant look
- Chill the baked shells before adding curd to keep them crisp
- Add a pinch of salt to the curd for depth
Pro Tips
Honestly, these tiny tricks lift the whole dessert from good to unforgettable. I often find that a quick torch gives the meringue that hint of caramel without drying it out, and the salt amplifies the lemon’s brightness. So, take a moment, enjoy the process, and let the aromas fill your kitchen before the first bite.
The essence of the dish:
A fun fact or historical angle:
Flavor or sensory focus:
You Must Know
- Curd must be cooled before topping
- Meringue should be added while crust is still warm
- Do not over‑beat egg whites
Frequently Asked Questions
→ Can I make the crust ahead of time?
Yes, bake the shells fully, let them cool, then store in an airtight container for up to two days.
→ How do I keep the meringue from weeping?
Make sure the lemon curd is completely cooled and the crust is not too wet; add the meringue right before serving.
→ Can I substitute the butter in the crust?
Coconut oil works as a dairy‑free alternative, though it adds a faint coconut note.
→ Is it possible to use a food processor for the crust?
Absolutely; pulse flour, butter, and a pinch of salt until crumbly before adding ice water.
→ What if I don’t have a torch?
Place the assembled tarts under a preheated broiler for 1‑2 minutes, watching carefully to avoid burning.
→ Can I freeze these tarts?
Freeze the baked shells and curd separately; assemble and torch the meringue after thawing for best texture.
Chef's Tips
Make sure the lemon curd is fully cooled before adding meringue; otherwise the meringue may sink.,If you prefer a firmer curd, add an extra teaspoon of cornstarch.,For a decorative touch, grate a little lemon zest over the finished meringue.
Nutrition Facts
per serving
180
Calories
3g
Protein
25g
Carbs
7g
Fat
Taste Profile
Bright citrus balanced by sweet, airy meringue
Ingredient Substitutions
Don't have an ingredient? Try these alternatives
Margarine works well for the crust; coconut oil adds a subtle tropical note.
These alternatives add a gentle caramel nuance; adjust quantity to taste.
Recipe Variations
Try these delicious twists on the original
Spicy Version
Add a pinch of cayenne pepper to the lemon curd and sprinkle a tiny dust of chili powder on the meringue before torching.
Mediterranean Style
Fold finely chopped toasted pistachios into the crust and finish with a drizzle of honey over the meringue.
Common Mistakes to Avoid
Learn from others' mistakes for perfect results
- Over‑mixing the crust leading to a tough base.
- Adding meringue to a hot curd, causing it to sink.
- Leaving the meringue under the broiler too long, resulting in burnt peaks.
Meal Prep & Storage
Make Ahead Tips
You can bake the tart shells and prepare the lemon curd up to a day ahead; keep them sealed separately, then assemble and torch the meringue just before serving.
Leftover Ideas
Reheat gently in a low oven (300°F) for 5‑7 minutes; the meringue will regain a bit of its airy texture.
Perfect Pairings
Serve this with...
Cooking Timeline
Prepare crust dough, chill, and preheat oven.
Roll out dough, cut circles, and bake shells.
Cook lemon curd while shells cool.
Whip meringue to stiff peaks.
Assemble tarts, torch meringue, and let set.

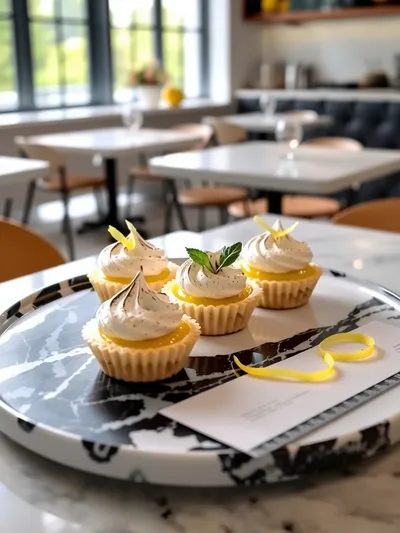
Mini Lemon Meringue Tarts – Quick & Easy Dessert
Enjoy bite-size Mini Lemon Meringue Tarts with tangy lemon curd and fluffy meringue—a perfect quick and easy dessert for any occasion.
Timing
Prep Time
20 Minutes
Cook Time
25 Minutes
Total Time
45 Minutes
Recipe Details
Ingredients
For the Crust
- 01 1 1/4 cups all‑purpose flour
- 02 1/4 cup granulated sugar
- 03 1/2 cup unsalted butter, cold and cubed
- 04 1 pinch salt
- 05 2–3 tbsp ice water
Lemon Curd
- 01 3/4 cup fresh lemon juice (about 3 lemons)
- 02 Zest of 2 lemons
- 03 1/2 cup granulated sugar
- 04 3 large egg yolks
- 05 2 tbsp butter, cubed
- 06 1 tbsp cornstarch
Meringue
- 01 3 large egg whites
- 02 1/4 tsp cream of tartar
- 03 1/4 cup granulated sugar
Instructions
Combine flour, sugar, and salt; cut in the cold butter until the mixture resembles coarse crumbs. Add ice water a tablespoon at a time, mixing just until the dough comes together.
Wrap the dough in plastic, chill for 30 minutes, then roll out on a lightly floured surface and cut 3‑inch circles to fit mini tart pans.
Bake the crusts at 350°F (175°C) for 12‑15 minutes until lightly golden. Remove and let cool completely.
While the crusts cool, whisk lemon juice, zest, sugar, egg yolks, and cornstarch in a saucepan. Cook over medium heat, stirring constantly, until thickened—about 5 minutes. Remove from heat and whisk in butter until smooth. Cool the curd to room temperature.
In a clean bowl, beat egg whites with cream of tartar until soft peaks form. Gradually add sugar, continuing to beat until stiff, glossy peaks appear.
Spoon cooled lemon curd into each crust, then top generously with meringue, using a spoon or piping bag to create peaks.
Use a kitchen torch, or place the tarts under a hot broiler for 1‑2 minutes, until the meringue is lightly browned.
Let the tarts sit for a few minutes to set, then serve. They pair beautifully with a cup of tea or a glass of chilled white wine.
Notes & Tips
- 1 Make sure the lemon curd is fully cooled before adding meringue; otherwise the meringue may sink.
- 2 If you prefer a firmer curd, add an extra teaspoon of cornstarch.
- 3 For a decorative touch, grate a little lemon zest over the finished meringue.
Tools You'll Need
-
Mini tart pans
-
Food processor or pastry cutter
-
Whisk
-
Saucepan
-
Kitchen torch or broiler
-
Piping bag (optional)
Must-Know Tips
- Don’t over‑mix the dough; it should stay crumbly to keep the crust tender.
- Let the curd rest completely before topping; this prevents weeping.
- Whip egg whites until they are glossy and hold stiff peaks for the best rise.
Professional Secrets
- Chill the dough for at least 30 minutes to prevent shrinkage during baking.
- Cook the curd over medium heat, stirring constantly, to avoid a grainy texture.
- Torch the meringue just until the surface turns golden; over‑torching can dry it out.

Recipe by
EvaEva is a seasoned home‑cook turned recipe developer who brings a dash of curiosity and a pinch of precision to every dish she creates for Your Website ...
Get Delicious Recipes Weekly
Join 25,000+ home cooks getting our best recipes straight to their inbox.
Free forever • No spam • Unsubscribe anytime