Why You'll Love It
- - Light, airy texture that melts in the mouth
- - Classic flavor combination of vanilla custard and chocolate
- - Easy to make with pantry staples
- - Perfect for birthdays, brunches, or a simple treat
*"The cake was so light yet satisfying, my family asked for seconds!"*
Essential Ingredient Guide
- All-purpose flour: Choose a fine, unbleached flour for a tender crumb; sift it to avoid lumps.
- Whole milk: Whole milk adds richness to the custard; let it sit a minute to reach room temperature.
- Dark chocolate: A good quality dark chocolate gives a glossy finish and a balanced bitterness.
- Vanilla bean or extract: Real vanilla beans intensify the custard’s aroma; a teaspoon of extract works too.
- Lemon juice: A splash brightens the custard and balances the sweetness.
- Powdered sugar: Use it for the whipped cream topping; it dissolves quickly for a smooth finish.
Complete Cooking Process
-
Ingredient Readiness:
Measure flour, sugar, and leavening agents; bring butter and eggs to room temperature for even mixing.
-
Flavor Development:
Whisk the custard gently over low heat, allowing the vanilla and lemon to infuse.
-
Texture Control:
Fold the whipped cream delicately into the cooled custard to keep the airy structure.
-
Finishing Touches:
Drizzle the chocolate glaze over the chilled cake, letting it pool into the poke holes.
-
Serving Timing:
Allow the cake to sit for 15 minutes after glazing so the flavors meld before slicing.
- Use a light hand when poking holes; just enough to let custard soak in.
- Cool the cake completely before adding custard to avoid soggy layers.
- For extra shine, melt chocolate with a touch of butter.
Pro Tips
Well, those little details make a world of difference. I remember when my first poke cake turned out a bit dry—oops, I hadn’t let it cool fully. Now I always give it that extra patience, and the result is just right. The aroma of vanilla and chocolate mingles beautifully, inviting the next bite.
The essence of the dish:
A fun fact or historical angle:
Flavor or sensory focus:
You Must Know
- Do not over‑mix batter; it keeps the crumb tender.
- Allow the cake to rest after baking for even texture.
- Poke holes while the cake is still warm for better absorption.
Frequently Asked Questions
→ Can I use almond milk instead of whole milk?
Yes, almond milk works, but the custard will be a touch lighter and less rich.
→ How long can I store the cake?
Refrigerate it in an airtight container for up to three days; keep the glaze separate if possible.
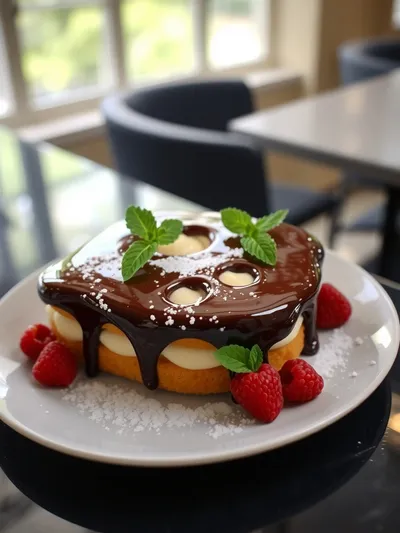
→ Can I add fresh berries on top?
Absolutely, fresh strawberries or raspberries add a pleasant tart contrast.
→ Do I need a special pan for this cake?
A standard 9‑inch round cake pan works fine; just grease it well.
→ Is the recipe gluten‑free?
Swap the all‑purpose flour for a 1‑to‑1 gluten‑free flour blend.
→ Can I freeze leftovers?
Yes, wrap each slice tightly and freeze for up to two months; thaw in the fridge.
Chef's Tips
Make sure the custard is fully cooled before pouring to prevent the cake from becoming soggy.,If you prefer a sweeter glaze, add a teaspoon of honey to the chocolate melt.,For extra flavor, sprinkle a pinch of sea salt over the chocolate glaze just before serving.
Nutrition Facts
per serving
380
Calories
6g
Protein
45g
Carbs
18g
Fat
Taste Profile
A balanced sweet‑cream and chocolate experience
Ingredient Substitutions
Don't have an ingredient? Try these alternatives
Use a 1‑to‑1 swap; the texture may be slightly denser.
Provides a dairy‑free option but adds coconut flavor.
Recipe Variations
Try these delicious twists on the original
Spicy Version
Add a pinch of cayenne and a drizzle of chocolate chili sauce for a subtle kick.
Mediterranean Style
Incorporate orange zest into the custard and top with toasted almond slivers.
Common Mistakes to Avoid
Learn from others' mistakes for perfect results
- Overmixing batter leads to a dense crumb.
- Adding custard before the cake is fully cooled makes it soggy.
- Using low‑quality chocolate results in a dull glaze.
Meal Prep & Storage
Make Ahead Tips
You can bake the sponge layers up to two days ahead, store them sealed, and assemble with custard and glaze just before serving.
Leftover Ideas
Reheat gently in a skillet over low heat, adding a splash of milk if the cake feels dry.
Perfect Pairings
Serve this with...
Cooking Timeline
Gather and measure all ingredients; preheat oven.
Cream butter and sugar, add eggs, then incorporate dry ingredients.
Bake the cake; allow to cool on a wire rack.
Prepare custard, whisk until thick, then cool.
Poke holes, pour custard, and let it soak.
Whip topping, drizzle chocolate glaze, chill before serving.
Boston Cream Poke Cake
Indulge in a light, fluffy Boston Cream Poke Cake topped with sweet cream and chocolate glaze. This dessert feels like a gentle hug on a plate, perfect for any gathering.
Timing
Prep Time
20 Minutes
Cook Time
25 Minutes
Total Time
45 Minutes
Recipe Details
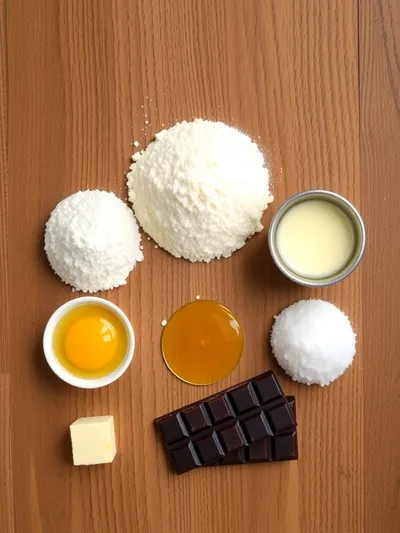
Ingredients
Cake
- 01 2 cups all-purpose flour
- 02 1 1/2 cups granulated sugar
- 03 1 cup unsalted butter, softened
- 04 4 large eggs
- 05 1 cup whole milk
- 06 2 tsp baking powder
- 07 1 tsp vanilla extract
- 08 Pinch of salt
Vanilla Custard
- 01 2 cups whole milk
- 02 1/2 cup granulated sugar
- 03 3 egg yolks
- 04 3 tbsp cornstarch
- 05 1 tsp vanilla extract
- 06 1 tbsp lemon juice
Chocolate Glaze
- 01 4 oz dark chocolate, chopped
- 02 2 tbsp butter
Whipped Topping
- 01 1 cup heavy cream
- 02 2 tbsp powdered sugar
- 03 1 tsp vanilla extract
Instructions
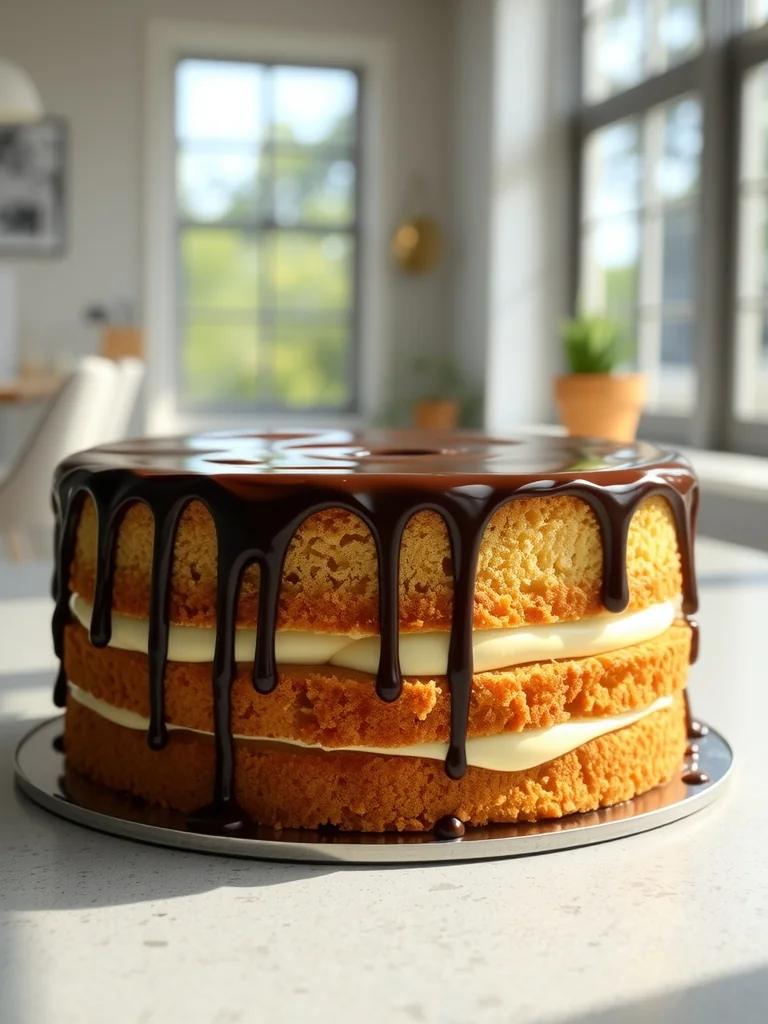
Preheat the oven to 350°F (175°C). Grease a 9‑inch round pan and line the bottom with parchment.
In a bowl, cream butter and sugar until light and fluffy; add eggs one at a time, then stir in vanilla.
Sift flour, baking powder, and salt together; fold into the butter mixture alternately with milk, mixing just until combined.
Pour batter into the pan and bake for 25‑30 minutes, or until a toothpick comes out clean. Let the cake cool completely on a wire rack.
While the cake cools, prepare the custard: whisk together milk, sugar, egg yolks, and cornstarch over medium heat until thick; stir in vanilla and lemon juice, then cool.
Using a wooden spoon, poke evenly spaced holes across the surface of the cake. Slowly pour the cooled custard over the cake, allowing it to soak into each hole.
Whip the heavy cream with powdered sugar and vanilla until soft peaks form; spread or pipe over the custard‑soaked cake.
Melt the dark chocolate with butter in a double boiler; drizzle the glossy glaze over the whipped topping.
Refrigerate the assembled cake for at least 30 minutes before slicing to set the layers.
Notes & Tips
- 1 Make sure the custard is fully cooled before pouring to prevent the cake from becoming soggy.
- 2 If you prefer a sweeter glaze, add a teaspoon of honey to the chocolate melt.
- 3 For extra flavor, sprinkle a pinch of sea salt over the chocolate glaze just before serving.
Tools You'll Need
-
9‑inch round cake pan
-
Mixing bowls
-
Electric mixer
-
Wooden spoon
-
Whisk
-
Double boiler or microwave-safe bowl
Must-Know Tips
- Don't overmix the batter; it keeps the crumb tender.
- Let the cake cool completely before adding custard.
- Poke holes while the cake is still warm for better absorption.
Professional Secrets
- Room temperature butter and eggs ensure even incorporation.
- Sift dry ingredients to avoid clumps in the batter.
- Use a double boiler for a smooth, glossy chocolate glaze.

Recipe by
EvaEva is a seasoned home‑cook turned recipe developer who brings a dash of curiosity and a pinch of precision to every dish she creates for Your Website ...
Get Delicious Recipes Weekly
Join 25,000+ home cooks getting our best recipes straight to their inbox.
Free forever • No spam • Unsubscribe anytime